Create a set of gymnastic exercises in motion. Gymnastics for beginners for weight loss
The result does not come out of nowhere; an indicator of even the slightest progress of a gymnast is long and painstaking work both in the gym and outside its walls. Just as at school the teacher gives homework assignments, so our coach gives exercises to repeat at home. Doing your homework shouldn't take a lot of time. 40-45 minutes is the maximum. It is very important to start your workout with a warm-up. It is better to spend more time warming up your ligaments and joints than to immediately do the splits. Unfortunately, such activities will be of no use. So, how can beginner athletes practice rhythmic gymnastics at home? We'll figure out.
Warm-up for children at home
Children who go to classes at Balance school must know what exercise and how to do it, because the trainer not only shows, but also talks about it in theory. correct execution exercises. You should start training with simple exercises that help prepare the body for stress. Such exercises are half-toe exercises, squats, various bends (right, left, back). You should also sit on your toes before starting gymnastic exercises so that the girl remembers that there are toes on her feet that cannot be relaxed even for a second during class. After a mini warm-up, you can start training.
The main part of children's gymnastics classes at home
Preparing children's exercises
The first exercise should continue to warm up the muscles, and it is best if it is a fold. The fold is done with straight knees and a straight back. Ideally, the stomach should lie on the hips. By doing this exercise The popliteal ligaments are stretched, which will subsequently affect the stretching of the longitudinal twine (front leg). After the fold comes the butterfly exercise. During the butterfly, both the inguinal ligaments and part of the back surface hips. The heels are pressed as close as possible to the butt, the stomach lies on the feet, and the knees are on the floor. The exercise also prepares the gymnast for stretching into the splits. The “chicken” exercise stretches the front surface of the thigh. When performing this exercise, keep your knees together and your back firmly pressed to the floor.
The next exercise for warming up and stretching the ligaments can be the “frog”, during which the groins are stretched and the legs are prepared for stretching into a transverse split. It is important that your knees and butt are in line. When the “frog” is more or less mastered, you can add alternating straightening of the legs (semi-transverse split). There is also one line between the legs.
When your legs are warm, you need to stretch your back. It should be kneaded with simple exercises. For example, “kitty”. After the cat, you should lie on your stomach and bend backwards. When performing the exercise well, the socks should reach the eyes, or even the chin. But we should not forget about physiology. Unfortunately, not everyone can make such a deep “ring,” so it is important to do everything carefully, to the best of your ability, without damaging your back, because the spine is our everything. After the “ring” you can make a “basket”. The exercise not only develops back flexibility, but also develops the shoulder joints.
Basic exercises for home practice
After stretching, you need to begin exercises that require muscle tension. These are pumping exercises for the abs and back. For the youngest beginner gymnasts, the corner exercise will be an abdominal exercise. Sitting on your butt, raise your legs with your toes to the ceiling and fix this position for at least 10 counts. For the back muscles, you should do a boat: simultaneously raising your arms and legs from the floor. The higher the better. Fixing also at least 10 accounts.
After these simple exercises for the abs and back, you need to make a bridge. Here you should make sure that your fingers are pointing towards your heels and your elbows are not pointing in different directions. the main task in the bridge: lift your head off the floor as high as possible. the main task gymnastic bridge: bring your fingers as close to your heels as possible (before touching).
The next exercise will be a birch tree. This seemingly simple exercise often causes difficulties. Children often cannot find balance. This exercise allows you to feel your body in space and strengthen your muscle corset.
We finish the workout with the splits. We pull the twine along one line and sit on the floor with both legs, not the butt (the lift of the front leg and the heel of the back point to the ceiling). It is very important to pull the twines at the very end of the load. After the splits, you can stand in a heron position (on one leg) or jump, remembering to stretch your legs.

I-III class
1. I. p. - feet shoulder-width apart, arms freely lowered: 1- 3 - raise your arms up, stand on your toes, stretch (inhale), 4- 6 - relax your muscles, return to i. n. (exhale). Perform the exercise 3-4 times.
2. I. p. - o. p.: 1-sit down, relaxing the muscles of the torso and lowering your arms freely down, 2-maintain the accepted position (exhale), 3-return to i. p., 4 - pause (inhale). Perform the exercise 4-5 times.
3. I. p. - o. s., arms to the sides. 1-2 - circles with arms forward, the same, back. Options: successive circles (one hand behind half a circle), large simultaneous circles, alternating them with medium circles forward and backward (elbows pressed to the body), large counter circles with body turns.
4. I. p. - stand - legs apart: 1 - tilt to the right, the right hand slides down the thigh; the left one, bending, slides up the body, 2 - and. p., 3-4 - the same, in the other direction. Options: the same, doing two springy inclinations without stopping and and. P.
5. I. p. - stand - legs together, arms to the sides: jumping. Options: complete the exercise with upward movements of the arms. After jumping - walking in place.
6. I. p. - stand - legs together, hands on the belt: 1 - right leg forward, 2 - to the side, 3 - back, 4 - move. The same with the left foot. Variations: the same, with arm movements forward, to the sides, forward and to the waist.
IV-VI class
1. Walking in place with vigorous arm movements. Options: walking, raising your knees high; walking with changes in pace; alternating walking and running in place.
2. I. p. - o. p.: 1 - arms to the sides; 2 - arms up, stretch, 3 - arms to the sides, 4 - arms down. Variations: the same, rising on your toes, to the count of “2”. The same thing, taking a step to the side on the count “1” and placing your foot on the count “4”.
3. I. p. - wide stance - legs apart, hands on the belt: 1 - squat on the left leg, arms forward, 2 - i. p., 3-4 - the same, squatting on the right leg. Options: spring squats 2-3 in a row.
4. I. p. - stand - legs apart, hands on the belt: 1 - bend forward 2 - straighten up, 3 - bend back, 4 - i. p. Options: two springy bends forward and backward, on the count of “2” - repeat bending forward, bending over, arms to the sides.
5. I. p. - o. p., arms to the sides: 2 circles with arms forward, the same, back. Options: successive circles (one hand behind half a circle), large simultaneous circles, alternating them with medium circles forward and backward (elbows pressed to the body), large counter circles with body turns.
6. I. p. - stand - legs apart: I - tilt to the right, the right hand slides down the thigh, the left hand, bending, slides up the body, 2. p., 3-4 - the same, in the other direction. Options: the same, doing two springy tilts without stopping in and. P.
7. I. p. - stand with legs together, arms to the sides: 1 - jump legs apart, arms down, 2 - jump legs together, arms to the sides. Options: complete the exercise with upward movements of the arms. After jumping - walking in place.
8. i. n. - stand - legs together, hands on the belt: 1 - right leg forward, 2 - to the side, 3 - back, 4 - put it down. The same with the left foot. Variations: the same, with arm movements forward, to the sides, forward and to the waist.
VII-VIII class
1. Walking in place with vigorous arm movements.
2. I. p. - o. s.: 1 - step with your left foot to the side, hands to your shoulders, 2 - hands up, stretch, 3 - hands to your shoulders, 4 - put your foot, hands down. Options: the same, rising on your toes, at the count of “2”, at the count of “1” clench your hands with force in your fists, and at the count of “2” spread your fingers wide.
3. I. p. - stand - legs together, hands on the belt: 1 - right leg to the side, 2 - lunge with the right to the right, 3 - pushing off with the right, stand on the left, right to the side, 4 - place the right foot. Options: supplement the exercise with arm movements to the side.
4. I. p. - o. s.: 1 - bend forward with a straight torso, arms to your shoulders, 2 - straighten up, arms down. Options: bending over to the count of “1” with your hands behind your head.
5. I. p. - stand - legs together, arms to the sides: 1-2 - two circles with arms downwards, 3-4 - two circles with arms up. Options: on the count of “3” - bend your arms forcefully towards your shoulders, squeezing your hands into fists, on the count of “4” - to the sides.
6. I. p. - stand - legs apart, hands on the belt: 1 - right arm to the side with the body turned to the right, 2 - i. p., 3-4 - the same, in the other direction. Options: two springy turns to the right and left without stopping at and. p., turns the body with arms spread to the sides, palms up, jerking them back.
7. I. p. - stand - legs together, arms to the sides: 1 - bend the right leg in front, 2 - i. p., 3-4 - the same, bending the left leg. Variations: arms forward, palms down.
8. I. p. - stand - legs together, hands on the belt. Jumping on two legs with turns of 90 and 180°. Options: turn every second jump; alternate turns; after jumping - walking in place.
9. I. p. - stand - legs apart: 1 - hands behind the head, 2 - left hand up, right hand forward, 3 - hands behind the head, 4 - hands down. The same, changing the position of the hands to the count of “2”. Options: arms to the sides, alternating movements of the arms to the sides, up, to the sides and down, starting with the right hand (the left one lags behind by one count). The same, the left hand is turned on sequentially (for four counts).
(Told by master of sports in rhythmic gymnastics Yulia Sitnikova)
You've probably had the opportunity to watch gymnasts perform on TV more than once, how they masterfully perform the most complex technical elements. All this is many years of training. And where did it all begin? Mothers bring little tiny creatures to rhythmic gymnastics at 4-5 years old. The first year is one of the decisive stages: girls learn the basics of gymnastics - the basic basic elements, they are stretched, they do a lot of flexibility exercises, they pump up the muscles of their legs, abs, back, arms, and learn to pull their toes and knees. And most importantly, girls begin to feel (control) their bodies. In this article we will look at the main (basic) elements with which rhythmic gymnastics begins.
I. Twine.
There are several types of twines: right, left, transverse and vertical. The vertical is a more complex element and here, in addition to stretching, you also need to be able to maintain balance on one leg. Stretching is very important for a future gymnast. Therefore, the element needs to be given a lot of attention, especially to the correct execution. Before doing stretching or flexibility elements, you must first “warm up” the child. Jump a little, run with him, do squats, squat (like ducks) so that the child’s muscles are elastic and easier to stretch. Remember - never pull on an unheated (“cold”) child; in addition to pain, you can also damage the baby’s ligaments. Do not do anything abruptly, only with smooth movements and springing several times.
There are several ways to stretch for splits:
Properly executed twine:
- right or left split: the child sits on the split, shoulders and hips are on the same line, the back is flat, the knees and toes are tense; - transverse split: stand on the side and look, if the legs are on the same line, the knees and toes are tense, then the child is sitting Right. If there is no line (i.e. a corner instead of a line), then it is not a split, but legs apart).
If you want to achieve results in stretching, then it is advisable to do the exercises daily, then the muscles will become more elastic. And of course, the sooner you start doing it, the better. Another important element for twine is the fold.
II. Fold.
A fold is when a child sits on his butt, legs together in front of him, and his tummy lies completely on his legs, his hands clasped his heels, his knees are stretched like “strings.” 
Exercises to help prepare for the fold:
- The child sits on his butt - his legs lie together in front of him on a small chair and we bend forward (put the tummy on the legs) trying to grab the heels.
- The child sits on his butt, legs in front of him - we do exercises with both feet together: towards ourselves - pull towards the floor (20-30 times), knees stretched. Then we fixed our feet towards ourselves and leaned towards the legs, trying to reach the feet and grab them.
- Standing position: legs together, knees extended, bend forward - you need to put your palms completely on the floor, then try to hug your legs. This exercise can also be performed in motion: do small steps legs together with a forward bend and reach the floor with your hands (or place your palms on the floor), the tummy should lie on the walking leg.
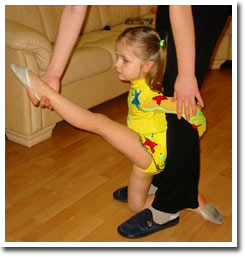
- We are facing wall bars- we throw one leg onto the wall bars at the level of the hips (hips and shoulders on the same line) - and bend towards the leg (to the right and to the left).
Your baby will be better able to do these exercises if you are an example for him! Do these exercises against each other and point out your baby’s mistakes. Be a positive example for him! What the fold exercise does is stretch the hamstrings, which play a big role when stretching into splits.
III. Bridge.
Your little one has probably tried to stand on the bridge on his own more than once. Even when they are very small, they often bend over backwards, making their first funny parodies of the bridge. How to make bridges correctly? The correct bridge is when the fingers are as close as possible to the heels of the feet (touching is desirable), the feet are shoulder-width apart (a little wider is possible). The bridge turns out to be beautiful and high. 
Exercises to develop flexibility and pump up the back muscles of a child:

When the child’s back is already a little prepared, it’s time to start teaching him how to make a bridge “from above”, i.e. bridge from a high position. First, it is better to lay something soft on the floor (so as not to hit your head), since the child’s arms are still weak and will creep to the sides, and of course, do this exercise at first only with mom (dad) nearby. Then you should take the correct stance: feet shoulder-width apart, hands at the top near the ears, eyes raised up and looking at the tips of the fingers. Then hold the child under the back (it’s better for you to take a position on the side of the child and he will, as it were, lie on your hand), the baby little by little (slowly) begins to tilt back. When the deflection is so good (the eyes see the floor), then you can lower your hands to the floor. You can also hold the child by the swimsuit (T-shirt, blouse) while standing in front of him. Each time, reduce the degree of your participation in the process of standing on the bridge. When you are sure that the child will not fall on his head, try to have the child make the bridge on his own. And one more thing very useful exercise which will help your baby learn to make a “bridge from above” - the child stands with his back to the wall (preferably a Swedish one) at a short distance from it, bends and begins to gradually move his arms to the very bottom of the wall and then, moving his hands to the floor itself (if This is a Swedish wall - he intercepts the sticks alternately with his right and left hands).
The back has been stretched, the legs have been stretched, it’s time to pump up the abs. There is a good exercise corner for this.
IV. Corner
Corner - sitting position on your butt, legs together, lift your legs and arms off the floor and hold the corner. Hands to the side (will help maintain balance), legs point up towards the ceiling. It is advisable to hold the corner for 5 seconds to begin with. Then, each time you repeat this exercise, increase the time it takes to perform it. Your child will have more fun doing this exercise if you keep him company.
Several exercises to strengthen your abs:

There are still very good exercise to strengthen the lateral back muscles: - you lie on your side with the baby opposite each other, one hand under your head, the other lies in front of you. The legs are extended and one of them is raised 45 degrees. We make movements - we pull one leg up to the position of the other (as if we were kicking up the raised leg), we start working lateral muscles backs. - you are in the same position, but now you raise your body, leaning on the hand that is in front of you. Second hand behind the head.
V. Birch
Birch - lying on your back, legs up at the ceiling, holding your butt with your hands (arms bent at the elbows, legs together). You’ve probably done this exercise yourself more than once; now teach your child how to make a birch tree. At first it will be very difficult for the baby to hold his butt in his hands)), but with your help (hold his legs up) he will do it much better. 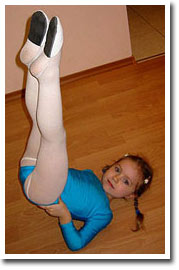
VI. Martin
Swallow - standing position, back straight, arms to the side, legs together. We raise one leg back, preferably so that the body remains vertical and the leg is raised as high as possible (horizontal to the floor and both legs extended). That's enough for a baby difficult exercises, since you need to learn to transfer the center of gravity of your body to one leg and be able to maintain balance. To begin with, start practicing the “heron” exercise with him: standing on one leg, the other leg bent at the knee and the toe pressed to the supporting leg, arms to the side (help to maintain balance). Alternate your supporting leg. As soon as the “heron” starts to turn out, move on to the “swallow”. In addition, a very useful exercise is to walk along one line: lay out a ribbon or jump rope and let the baby walk along it. 
VII. Somersault
Somersault is an element that young gymnasts are taught already in the first year of training and then used throughout sports life. Standing position, one leg extended slightly forward, arms also directed forward. We take a step with our legs, touch the floor with our hands, bend our heads towards our tummy, sort of group ourselves, roll onto our back, bend our crossed legs under ourselves and rise on the same leg with which we took the step. What mistakes can be made when performing this element: - make sure that the child does not stand on his head when performing a somersault (dangerous, it can damage the neck), - the somersault must be done in a group, then it will be neat and fast, and this is especially useful when the somersault is performed in a bunch of gymnastic exercises.
After you have worked out, it will be good to “unload” the spine. To do this, if you have a wall bars, then you can hang on the wall bars, if not, then take the child by the arms (or legs) and lift him off the floor.
 |
 |
Article added with permission from Yulia Sitnikova
GENERAL COMPLEX OF GYMNASTIC EXERCISES
These simple exercises Best done in the morning. They will not take much of your time and will not require a lot of effort and energy. They will “wake up” your muscles and prepare your body for active daily activities. So, get up early, walk to the beach and start exercising. Remember that they will bring the greatest effect if you take off your shoes before starting classes. Your feet will not feel the hardness of the soles of tight shoes, but the pleasant warmth of the soft sea sand.
EXERCISE 1
Place your feet shoulder-width apart, tilt your head first to the right, then forward, left and back. Repeat the exercise 8-10 times.
EXERCISE 2
Place your feet shoulder-width apart, keep your back straight, extend your left arm forward and your right arm back. Execute circular rotations hands, turning the body to the right and left. Repeat the exercise 20–30 times.
EXERCISE 3
Starting position: legs together. First lift your right leg and bend it at the knee, then pull your heel towards your buttocks. Stay in this position for 10–15 seconds. Do the same with your left leg.
EXERCISE 4
Try to simultaneously lift your right leg bent at the knee, bend your left arm at the elbow, and swing backwards with your right arm. Then raise your left leg bent at the knee, right hand bend at the elbow and swing with your left hand. Repeat the exercise 8-10 times.
EXERCISE 5
Heels together, toes slightly apart. Alternately lift up your right and then your left leg. Try to touch your chest with your knee. Do the exercise 15–20 times. Rest and repeat the exercise again.
EXERCISE 6
Feet together, raise your arms high up. Stand on your toes and lower yourself down. Do the exercise 15–20 times. Rest for a few seconds and repeat 15–20 more times.
EXERCISE 7
Place your legs slightly narrower than shoulder width, feet parallel to each other. Try to slowly raise and lower your heels 30–40 times, while keeping your back straight. Rest and repeat the exercise again. You can make the exercise more difficult if you perform it standing on one leg (right or left). Repeat each option 20 times.
EXERCISE 8
Feet shoulder-width apart, knees slightly bent, hands on your waist. Tilt your torso first forward and backward, then right and left. Do 10–15 bends in each direction. Rest and repeat the exercise one more time.
EXERCISE 9
Feet shoulder-width apart, knees slightly bent, hands on shoulders. Turn your torso to the right and then to the left without lifting your feet off the floor. Perform 20–25 turns in each direction.
EXERCISE 10
Place your feet shoulder-width apart and raise your arms up. Bend back at the waist, stretching your arms back, immediately following this, lean forward. The back should be straight. Repeat the exercise 10–15 times.
EXERCISE 11
Place your feet together, clasp your fingers so that your palms are turned up. Bend your torso forward and touch your palms to the floor. Then stand up straight. Repeat the exercise 10–20 times.
EXERCISE 12
Take a lunge step forward with your right foot and place both hands on your knee. supporting leg, left leg stretched out. Make 10-12 springy movements. Switch legs. Repeat 10-12 springy movements.
EXERCISE 13
Legs shoulder-width apart, feet parallel to each other, shoulders back, hands on hips. In this position, perform deep squats without lifting your heels off the floor. Do the exercise 15–20 times. Rest for 1-2 minutes and repeat again.
You can complete this set of exercises with brisk walking or jogging.
Fast walking and just walking barefoot have a beneficial effect on human health, as they contribute to a greater extent to the active saturation of the body with oxygen, necessary for the implementation of all vital processes.
If we compare running and walking, the latter, as one of the possible means of health training, is preferable to the former, since when running the overall load on the joints of the legs and spine increases. In addition, intense walking provides a load comparable to the load during running.
It is better to start with exercises to develop coordination of movements, mobility of joints and spine, and to strengthen the muscles of the legs.
Get rid of pain in the spine, sacral region will help the following exercises, which are also preferable to perform on sand. You will need a large beach ball.
EXERCISE FOR THE SHOULDER GIRT
Sit on your heels, tilt your torso forward, extend your arms forward, place your palms on the ball. Bend your torso down with springy movements.
EXERCISE FOR THE SPINE
Lie on the ball with your back, extend both arms back. Slowly pull your hands forward and down (towards the ground), while the ball should remain motionless.
EXERCISE TO RELAX THE BACK MUSCLES
Sit on the ball, spread your legs to the sides. Shoulders should be straightened, arms raised up. Using your hands, try to lift an invisible heavy load.
EXERCISE TO STRENGTHEN ABDOMINAL MUSCLES
To perform this exercise correctly, you need to sit on the sand and, leaning on your hands, hold the ball with your shins and feet, while either raising it or lowering it. Repeat the exercise 10-12 times.
EXERCISE FOR THE BUTTOCKS AND HIPS
Standing on your right knee, place your left foot on the ball and keep both hands at your foot. Gently push the ball forward using light pressure on your raised foot. Repeat the exercise for your right leg.
EXERCISE TO PULL THE BACK LINE OF THE THIGH
Lie on your stomach, stretch your arms forward, and hold the ball between your feet. Bend your knees, while trying to touch your buttocks with your heels. To achieve maximum effect, try to tense your entire body.
While doing the exercises, you will, of course, be tired, and it will take some time to get some rest, so we suggest doing the last exercise, which will help the muscles relax thoroughly.
Sit on the sand with your back to the ball, bend your knees. Hold the ball firmly with your hands. Then lie down on it with a sliding movement, straightening your legs.
If you are a fan of walking barefoot on warm, soft sea sand, please accept my sincere congratulations. Such walks can not only give a person a lot of pleasant sensations, but also bring invaluable benefits. The very feeling of hot or lukewarm sand, small sea pebbles will bring you pleasure, you will enjoy the warm breeze blowing your feet, the sun's rays gently caressing your skin will relax you, but that's not all. You probably don’t even suspect that while walking barefoot on the sea sand, a person is receiving an acupressure session.
Acupressure, or, as it is also called, acupressure, is a kind of synthesis of acupuncture (acupuncture) and conventional massage and is one of components traditional Chinese medicine. Acupressure has excellent healing properties, relieves muscle tension, pain, and activates the metabolic process. Thanks to acupressure, the flow of blood and nutrients to tissues and organs increases.
The acupressure method is often used in cases where it is necessary to quickly relieve any painful sensations, for example, a headache or a slight tingling in the heart area, etc. The essence of the method is that, thanks to the influence of the fingertips on certain biologically active points, painful symptoms are relieved. In this case, you can use one single or several points at once, located in a certain order. First, you need to fix a certain point with your fingertips and lightly press on it, after which you can gradually increase the pressure until you feel a slight beating at this point, reminiscent of a tingling sensation.
Unlike acupressure, which means that within 1-2 minutes you can influence only one or, in extreme cases, two or three points located on your foot, when walking on sea sand you immediately influence almost all points .
Your feet truly deserve to be taken care of constantly because they keep you on the move. Most likely, you don’t even think about how important certain areas on the feet are for you and the body as a whole. First of all, there are a large number of nerve endings on the soles of the feet, and this is where important energy pathways that provide communication with the entire body end.
Ancient Chinese philosophers and healers believed that the soles of the feet represent a kind of “geographical” map of our body, since each part of the foot (its sole) is closely connected with a specific internal organ. For example, thumb directly connected with the activity of the brain (cerebellum, pituitary gland), a convex “section” of the sole located directly under thumb- with the activity of the thyroid gland, and the space next to it, occupying the area located under the other fingers - with the activity of the lung, etc.
By influencing certain points (reflex zones), you can get rid of headaches, relieve tension, etc. Moreover, regular massage (or frequent walks barefoot in the sand) are an excellent prevention of many diseases of the musculoskeletal and cardiovascular systems, gastrointestinal tract. If pain occurs, do not rush to take pills, since even the most effective of them affect the body in both positive and negative ways. Instead, take advantage of a special set of exercises that are performed on the sand and are based on the principles of acupressure of reflex zones.
This text is an introductory fragment. From the book Breathing gymnastics by A.N. Strelnikova author Mikhail Nikolaevich Shchetinin From the book The Complete Guide to Nursing author Elena Yurievna Khramova author From the book Treatment of prostatitis and other prostate diseases using traditional and non-traditional methods author Daria Vladimirovna Nesterova From the book Breathing gymnastics according to Strelnikova. Paradoxical, but effective! author Oleg Igorevich Astashenko From the book Restoring joint health. Simple and effective ways treatment author Irina Stanislavovna Pigulevskaya author Natalya Olshevskaya From the book 365 golden exercises breathing exercises author Natalya Olshevskaya From the book 365 golden breathing exercises author Natalya Olshevskaya From the book A set of exercises for spinal injuries. Exercises in the pool author author unknown From the book Slimness, youth, beauty. The Complete Kremlin Encyclopedia for Women author Konstantin Medvedev From the book The Best for Health from Bragg to Bolotov. Large reference book of modern wellness author Andrey Mokhovoy From the book Aerobics for the face: anti-aging exercises author Maria Borisovna Kanovskaya From the book Selected Exercises and Meditations by Nishi Katsuzou From the book Being healthy in our country author Pavel Valerievich Evdokimenko From the book The Perfect Ass. Anti-crisis program for a month author Olga DanGymnast Arthur Dalaloyan - absolute champion world, recently at a competition in Qatar he created a real sensation; before him, such victories among Russian gymnasts only happened 19 years ago. MH correspondent Igor Lazurny went to training with Arthur and tried to repeat the championship exercises.
Gymnastics is considered one of those sports, thanks to which male anthropometry becomes almost ideal. Pronounced muscles from the triceps to the lower abs, wide back- everything is pumped to the smallest muscles. Thanks to the fact that gymnastics includes different kinds exercises, an athlete can easily tighten all muscles, not just the core or pectorals. In men's competitions, these are floor exercises, vault, as well as exercises on rings, pommel horse, horizontal bar and parallel bars. Doesn't remind you of anything? Exactly, here is more than half of what is in any fitness room or even in the yard of your house.
It is important that gymnasts are not characterized by muscle overload; everything in the body, down to a single ligament, is elastic and light. Even pronounced triceps and biceps of the arms do not carry a huge mass, as in powerlifting. This form is achieved not only special exercises on equipment, but also a serious warm-up complex. Gymnasts do three workouts a day, so their morning begins with a massive muscle warm-up.

Once!
“For us it’s a warm-up, but for the average sports fan it can be more intense exercises.” high load for the body,” says Dalaloyan, clarifying that he seems to be out of shape. “First we warm the ligaments, which I would recommend to anyone involved in fitness. It is imperative to warm up everything, including the ligaments and muscles of the legs,” says the newly crowned absolute champion, while simultaneously sitting in a version of the cross split that is convenient for me. Dalaloyan agrees that stretching can be much more difficult for men, but nothing can be done about it.
“If you are not a professional athlete, then you don’t need to work hard and try to do the splits at all costs. There is no need to show character here. An ordinary sports fan needs to do everything so that there is tension, but not to break. That’s why it’s important to warm up here.”

Two!
"Now let's move on to more active exercises. Of course, such things can be useful primarily to people who work with hardware. Especially for those who shake their legs. Important point- knee training,” Arthur commands and immediately begins to do an exercise similar to a bouncing speed skater.
“The knees are the crux of everything,” I agree, remembering how this part of the legs feels if you suddenly forget to stretch it.

Three!
After this, we cheerfully move on to exercises to warm up our hands. Gymnasts warming up different groups muscles on the arms with push-ups. We try triceps push-ups. Moreover, in this sport you can do push-ups not only on a regular flat surface, but also with complications. "Here look. We usually do push-ups on a flat surface, but we can also use apparatus,” says Dalaloyan and deftly climbs onto the parallel bars. Push-ups on parallel bars are not technologically complicated. Those who were in the army should have remembered this patented exercise forever.
“We don’t do a lot of push-ups. There is no task to draw blood. For the average user, I will also give this advice: you can’t do a lot of push-ups, but it’s true from a technical point of view. You can even do the movement itself more slowly to load the muscle.”

Four!
Having completed the push-ups, Dalaloyan does not immediately move away from the bars. Then a workout man takes possession of him, and he demonstrates famous exercise"front hang".
“Well, this is already a bit complicated for the average user. Although almost everyone does this in workouts,” comments the world champion. And there really is something to strive for.

Five!
I tell Dalaloyan that in the long-popular CrossFit, and simply among visitors to fitness clubs, exercises on rings have become fashionable. Ring push-ups are already exercises for people who are a little more prepared. But you can’t call him directly professional either. Dalaloyan easily makes a power exit on the rings and performs impressive push-ups.
“Yes, they probably do this in fitness. This is more difficult than just doing push-ups. Although, of course, we don’t do such exercises. It’s important to go up there and coordinate your body position.”

Six!
Then we return to the floor exercise mat to watch the gymnasts warm up their legs. We drag Arthur a standard cube for training jumps from the same popular CrossFit. Only for gymnasts this cube is softer. Arthur explains that this exercise warms up the foot, the ankle itself, and other muscles close to the foot.
“This is also our warm-up,” Dalaloyan says as I twirl my finger at my temple. - We also warm up our legs before jumping exercises. We do everything a little differently and faster than in fitness rooms. In addition, we use a spring floor.”

Seven!
We had already practically tried all the equipment, but I was waiting for one thing: the crossbar, or, in common parlance, the horizontal bar. In response to a question about whether gymnasts pull themselves up in training, Dalaloyan says that they simply don’t need it. “Yeah, why is your back so wide?” - I don’t let up. "Fine, fine. Although we are not catching up, I will definitely win this against you,” Dalaloyan agrees to the competition. I immediately jump onto the horizontal bar, wanting to prove the opposite. It turns out not that much - 25 times. But this is enough to make me breathe a little. And Arthur calmly did a dozen pull-ups with an even smile and clearly performed the exit from the apparatus.

Eight!
But that was not the case, it was here that my proposal to make a corner arrived. “Come on, no problem. Just jump in first,” Arthur commanded, and my 90 kg clean muscle mass flew up onto the crossbar. We (but what can I say) endured for about a minute, after which we jumped off the projectile. I was extremely dissatisfied with the fact that I didn’t pull my socks up and didn’t even stretch my arms. Although this is already technical points. “Nothing, we’ll teach you,” Arthur threatened with a smile.